
This post may contain affiliate links. Please see our disclosure policy.

Why You’ll Love This Sweet Potato Cracker Recipe
There’s something so satisfying about pulling a tray of homemade crackers out of the oven and knowing exactly what went into them. No weird additives, no mystery ingredients. Just real food that happens to taste incredible. The dough comes together quickly, chills while you do other things, and rolls out way easier than you’d expect. If you’ve ever made my homemade baby puffs, you already know how fun it is to recreate a snack at home with simple ingredients. My kids love these, and I love that they’re getting extra nutrients from the sweet potato without even knowing it.
If your family already enjoys recipes that sneak in extra veggies, like my hidden veggie mac and cheese or hidden veggie chocolate muffins, this is another easy way to add a little boost without anyone noticing.
Ingredients You’ll Need
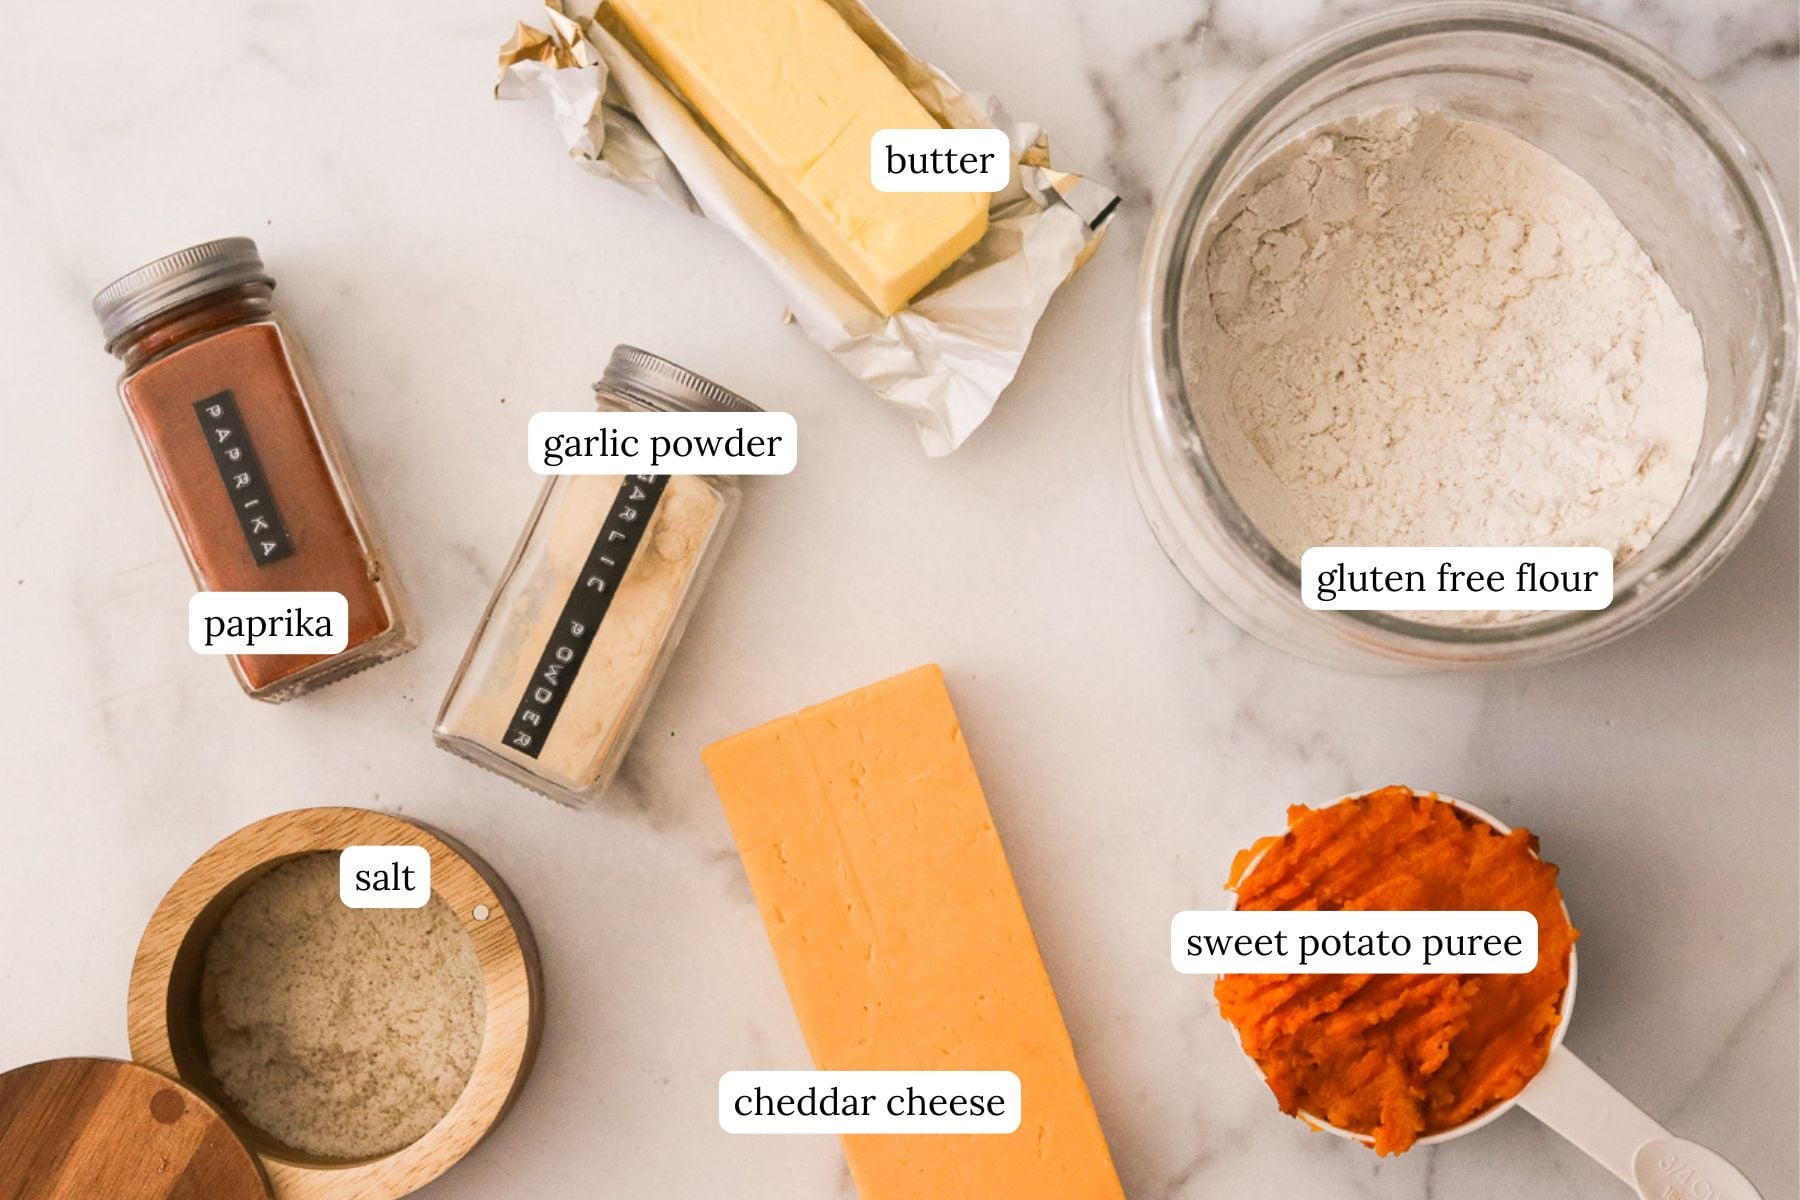
- Sweet potato puree: The base of the dough and the reason these crackers have a little something extra going on. It adds natural sweetness, moisture, and nutrients while helping hold everything together. I used my air fryer sweet potato recipe to make this!
- Shredded cheddar cheese: This is what gives the crackers that classic cheesy flavor and helps them get crispy as they bake. Freshly shredded melts better than pre-shredded cheese.
- Butter: Adds richness and helps the edges turn that deep golden color.
- Sea salt: Balances the sweetness from the sweet potato and pulls all the savory flavors together.
- Garlic powder: A little goes a long way here. It adds just enough savory depth so the crackers taste interesting, not flat.
- Paprika: Gives a mild warmth and a hint of color. Nothing dramatic, but you’d notice if it was missing.
- Gluten-free all-purpose flour: Brings the dough together and gives it enough structure to roll and slice cleanly. Regular all-purpose flour works fine if you don’t need these to be gluten-free.
How to Make Sweet Potato Crackers
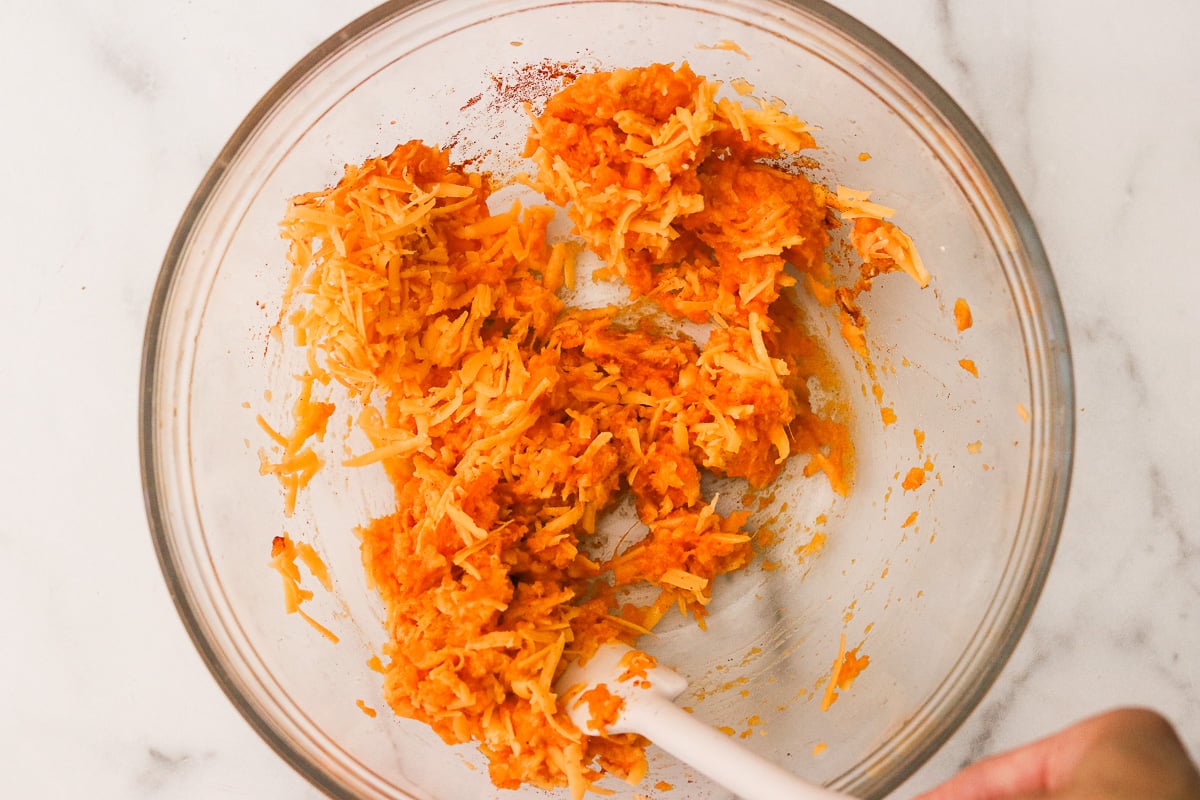
Step 1: In a large bowl, combine sweet potato puree, shredded cheddar cheese, butter, sea salt, garlic powder, and paprika. Stir until everything is well mixed.
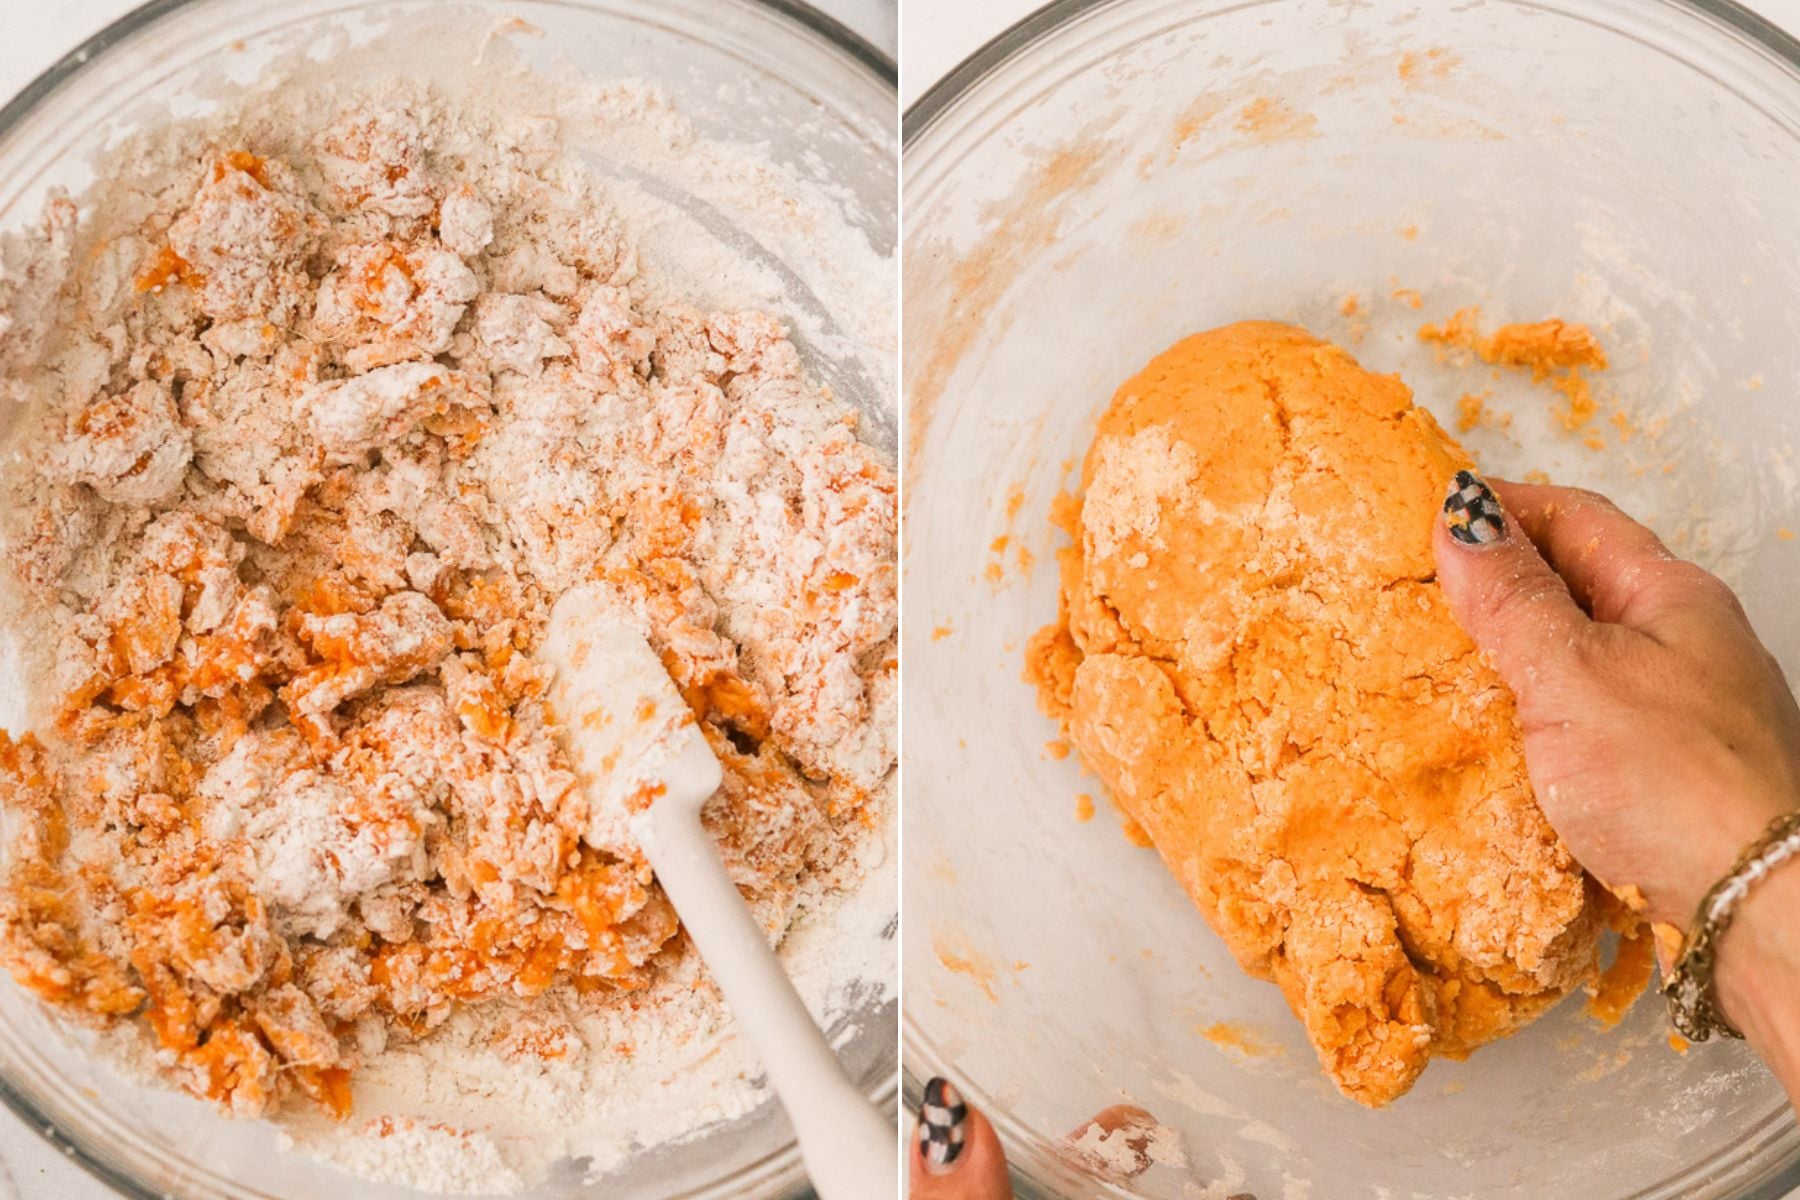
Step 2: Add the flour and stir until a dough forms. If the dough feels too wet, add a little more flour. If it’s too dry, add a small splash of water.
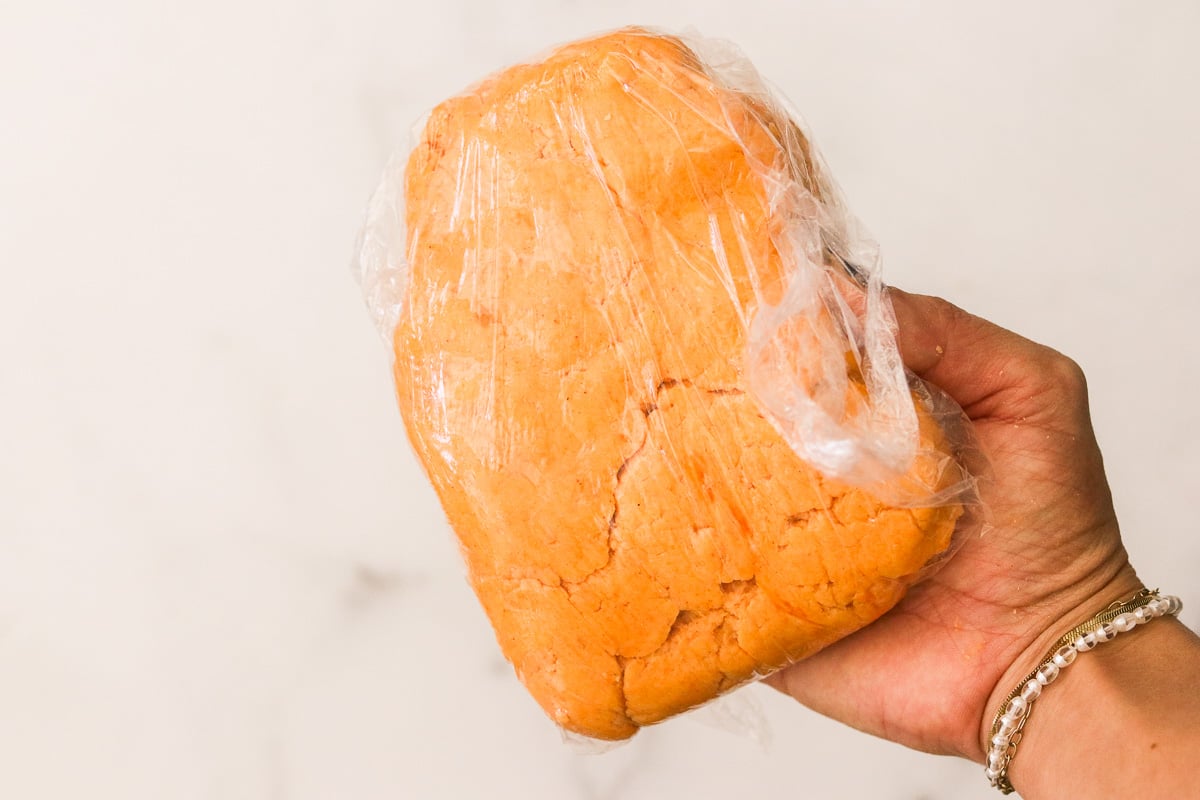
Step 3: Wrap the dough in plastic wrap and chill in the freezer for 30 minutes, or refrigerate for at least an hour if you aren’t making the crackers right away. This step is important. It makes the dough much easier to work with when rolling and slicing.
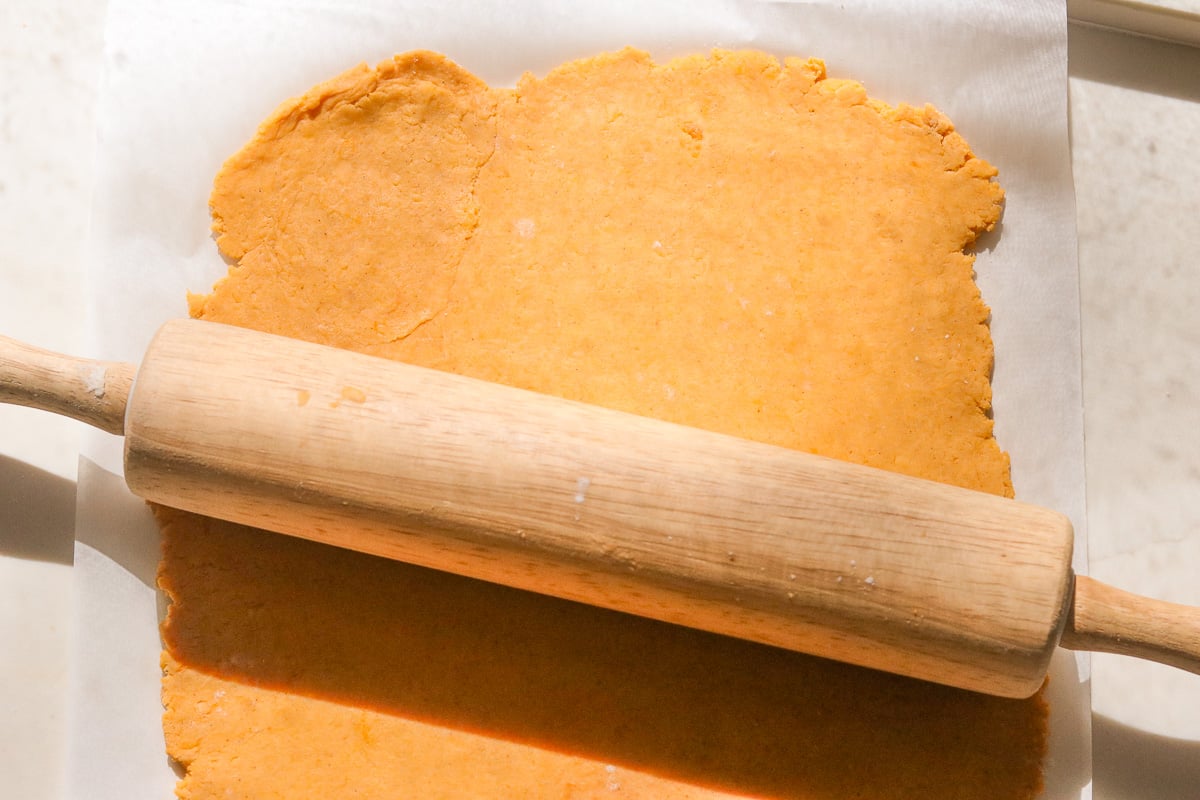
Step 4: Preheat the oven to 350°F. Roll the dough out directly on parchment paper until it’s about 1/8 inch thick.
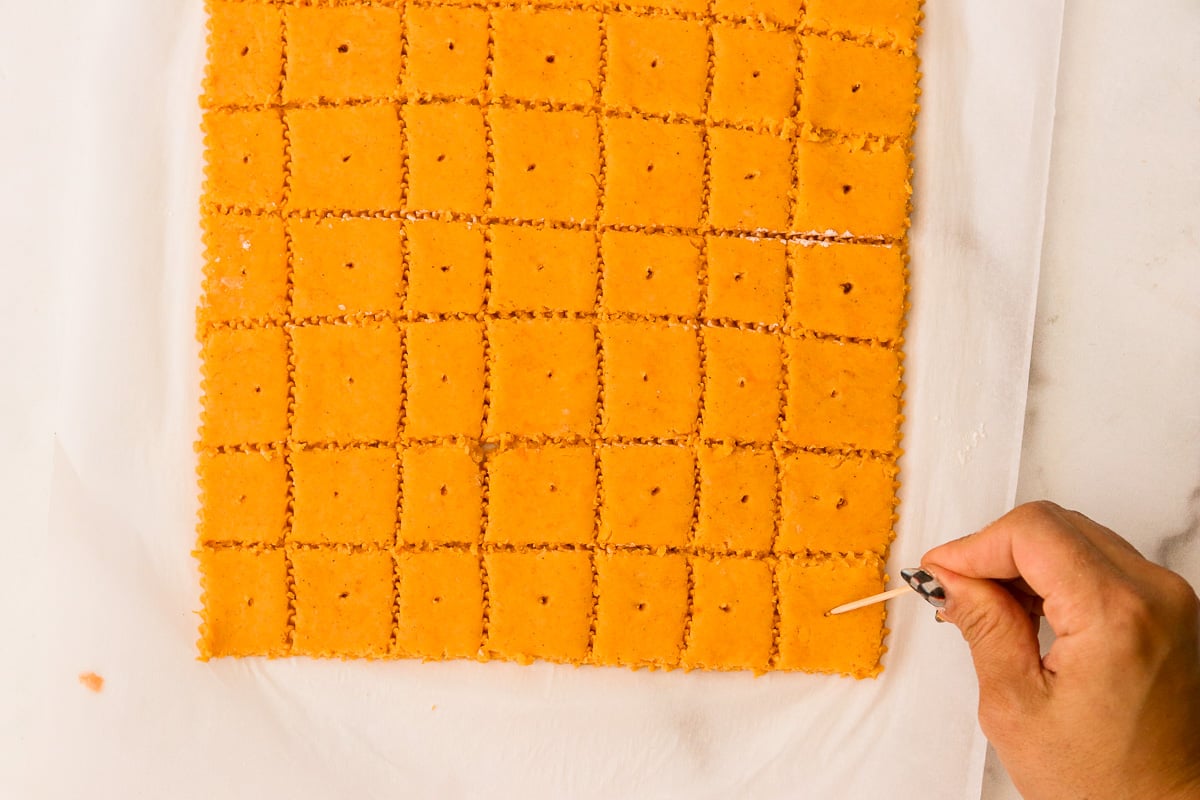
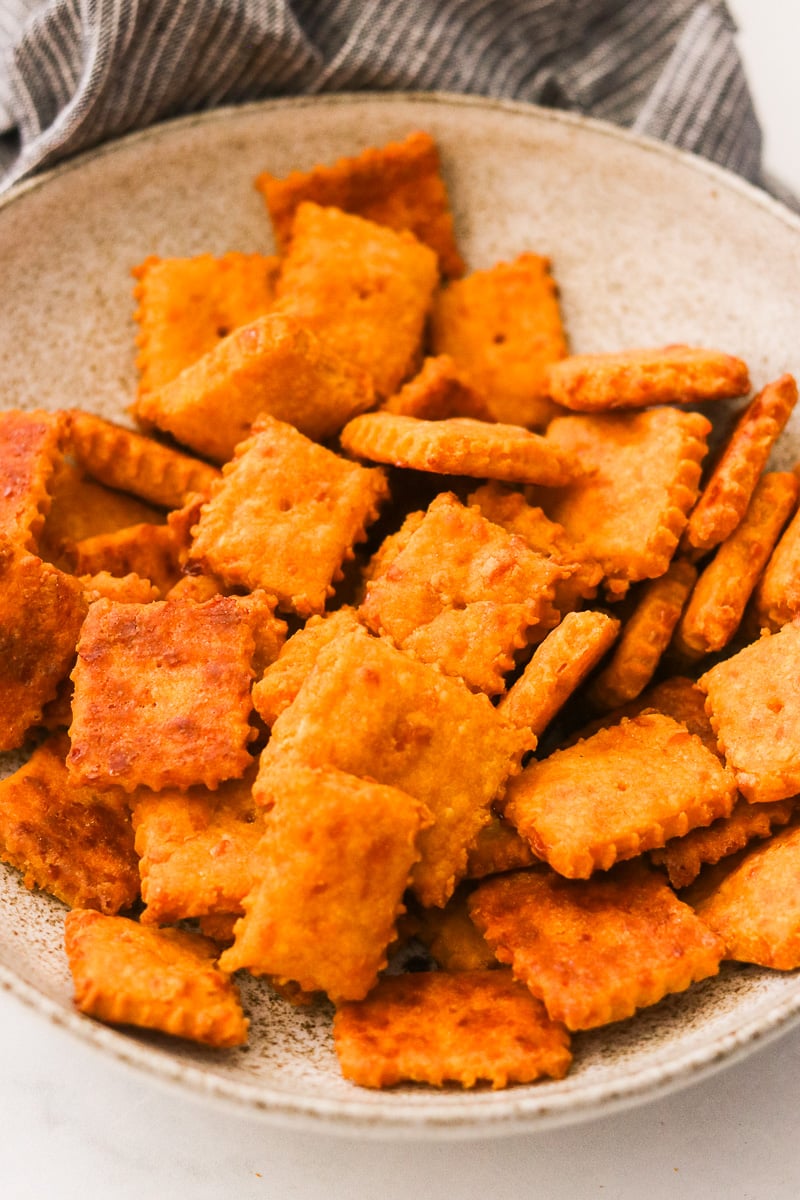
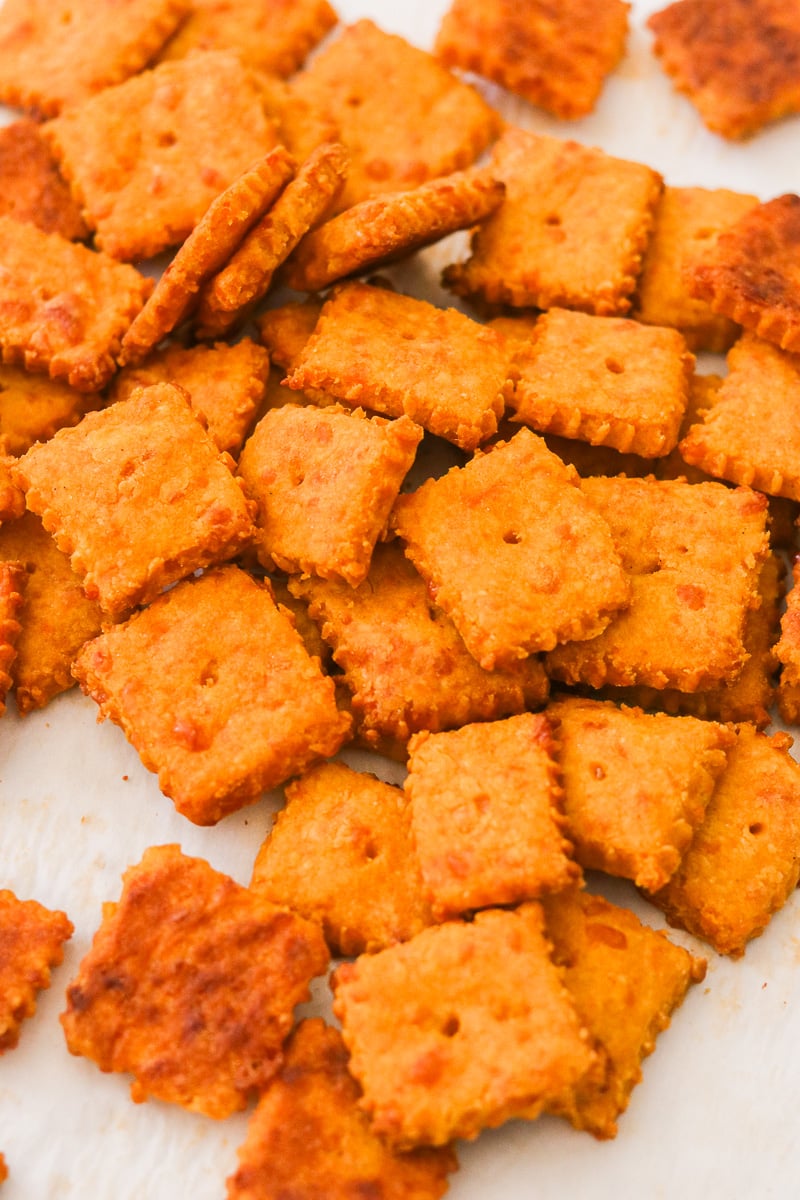
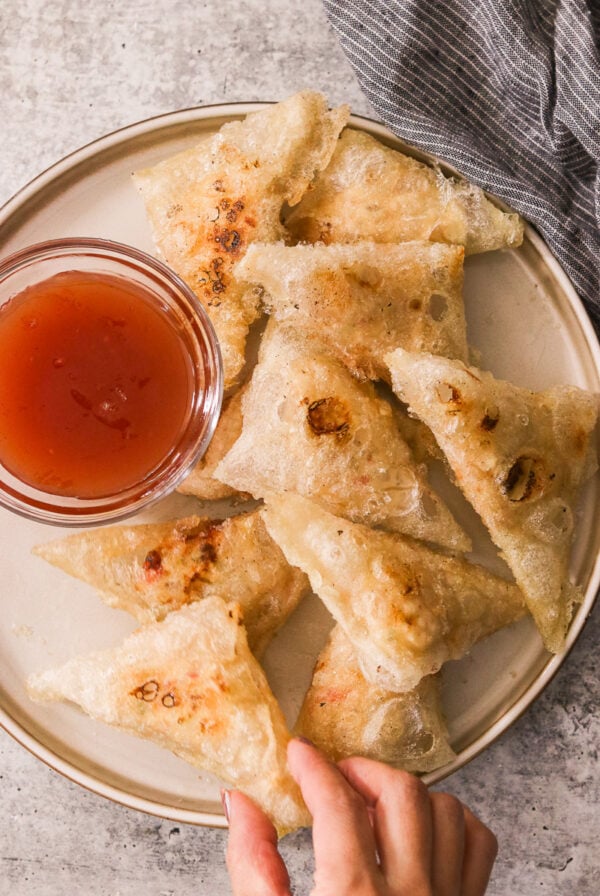
Step 5: Slice into 1×1 inch squares. I use a pastry wheel cutter for crimped edges, but you can also use a sharp knife for straight edges. Use a toothpick to poke a small hole in the center of each cracker so steam can escape while baking. Transfer the parchment with the cut crackers onto a baking sheet, spacing them out so they don’t touch.
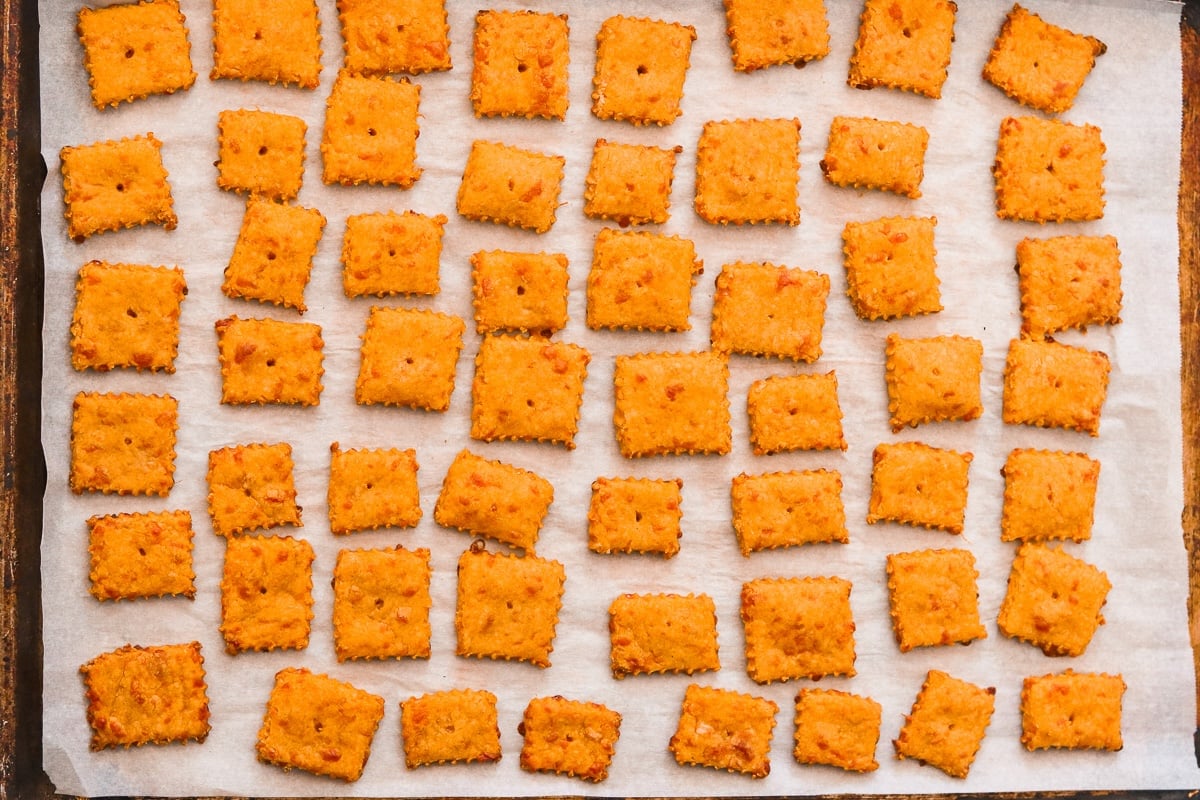
Step 6: Bake for 28-33 minutes, rotating the pan halfway through, until puffed and golden. Let the crackers cool completely. They will crisp up as they cool.
Tips for Crispy Crackers
Soft homemade crackers are the biggest disappointment, so let me save you from that fate.
- The single most important thing is rolling the dough thin enough. I’m talking an 1/8 inch. If you go thicker, they just won’t crisp up the way you want them to. Take your time here, and it pays off.
- Don’t skip the chill either. It firms the dough up so you can roll it evenly without it sticking or tearing everywhere. I’ve tried to rush this step and regretted it every time.
- Bake until they’re genuinely golden and feel set when you touch them. They’ll firm up more as they cool.
- Let them cool completely before you eat them. I know it’s hard. But this is actually when they finish developing that satisfying crunch that makes these worth making in the first place.
And for another hidden veggie option, try my hidden veggie pasta sauce, my kids love it too!
How to Serve Sweet Potato Crackers
These are great on their own straight off the baking sheet, but they’re also really good with a dip alongside them. Try them with my cauliflower hummus or this homemade guacamole for a snack plate the whole family will actually get excited about.
Storage & Make Ahead Tips
- You can also make the dough ahead of time and keep it in the fridge until you’re ready to roll and bake. If you want to freeze the dough, wrap it well and it will keep for up to a month. Just thaw it in the fridge overnight and let it sit on the counter for about 5 minutes before rolling.
- These healthy Cheez-its are best enjoyed fresh when they’re at peak crunch, but leftovers can be stored in an airtight container for 3-4 days once fully cooled.
- I recommend putting a silica gel pack in the storage container to maintain the crunchy texture. If they do lose some crunch, just bake them again at 300°F for about 5 minutes.
Recipe FAQs
This usually happens if the dough was rolled too thick or didn’t bake long enough. Rolling thin and baking until golden is key.
Store these homemade crackers in an airtight container and let them cool completely before storing. Re-baking for a few minutes can help restore crispness.
Yes! They’re very similar in flavor and texture, which is why they make such a fun (& healthy) alternative.
More Savory Snack Recipes

Recipe
Paleo & Keto Air Fryer Avocado Fries Recipe (with Oven Method)

30 Minutes or Less
Air Fryer Keto Fried Pickles Recipe (4 Net Carbs!)

Snacks
Air Fryer Zucchini Fries Recipe (Keto-Friendly)
If you make these sweet potato crackers, please leave me a star rating and comment below! I love to hear your thoughts and feedback. Follow me on social media Instagram, Facebook, and Pinterest for even more delicious recipes!

Easy Sweet Potato Crackers
Video
Ingredients
- 3/4 cup sweet potato puree, I used this method to cook it
- 1½ cup shredded cheddar cheese
- 2 tbsp butter, melted
- 1 tsp sea salt
- 1 tsp garlic powder
- 1/2 tsp paprika
- 1¼ cup gluten free all-purpose flour, or regular AP flour – plus more, if needed
Instructions
- In a large bowl, combine sweet potato puree, cheese, butter, salt, garlic powder, and paprika. Stir to combine.3/4 cup sweet potato puree, 1½ cup shredded cheddar cheese, 2 tbsp butter, 1 tsp sea salt, 1 tsp garlic powder, 1/2 tsp paprika
- Add the flour, and stir until a dough forms. You can add a bit more flour is the dough is too wet, or a little bit of water if it's too dry.1¼ cup gluten free all-purpose flour
- Wrap the dough in a cling wrap and freeze for 30 minutes, or refrigerate for at least an hour if you aren't making the crackers right away.
- Preheat the oven to 350 degrees F. Sprinkle a rolling pin with flour and roll the dough on top of parchment paper until it's about 1/8 inch thick.
- Slice into 1×1 inch squares (I used this pastry wheel cutter, but you can use a sharp knife), then poke a hole at the center of each square with a toothpick.
- Transfer the squares to a baking sheet lined with parchment paper, making sure they don't touch each other. Bake for 28-33 minutes until puffed and golden, turning the pan halfway though. Cool completely, and enjoy!
Notes
- The single most important thing is rolling the dough thin enough. I’m talking about 1/8 inch. If you go thicker, they just won’t crisp up the way you want them to. Take your time here, and it pays off.
- Don’t skip the chill either. It firms the dough up so you can roll it evenly without it sticking or tearing everywhere. I’ve tried to rush this step and regretted it every time.
- Bake until they’re genuinely golden and feel set when you touch them. They’ll firm up more as they cool.
- Let them cool completely before you eat them. I know it’s hard. But this is actually when they finish developing that satisfying crunch that makes these worth making in the first place.
- These healthy Cheez-its are best enjoyed fresh when they’re at peak crunch, but leftovers can be stored in an airtight container for 3-4 days once fully cooled.
- I recommend putting a silica gel pack in the container to maintain the crunchy texture. If they do lose some crunch, just bake them again at 300°F for about 5 minutes.
- You can also make the dough ahead of time and keep it in the fridge until you’re ready to roll and bake. If you want to freeze the dough, wrap it well and it will keep for up to a month. Just thaw it in the fridge overnight and let it sit on the counter for about 5 minutes before rolling.
Nutrition
Nutrition information is automatically calculated, so should only be used as an approximation.

Have you tried with any other flour? My daughter can’t have rice flour, which is in every gf flour. Do you know if Buckwheat might work?
I haven’t tried, sorry!
Looks so very good. I have to try your recipe. Thanks for sharing with everyone.
Haven’t made it yet. (Will follow the recipe to the letter the first time. Wondering whether I can use the sweet potato flour that I already have? (Plus makes it more of a panrtry recipe?)
I’ve never used sweet potato flour so I’m not sure how that’ll turn out. I definitely wouldn’t substitute sweet potato puree with the flour version.
Kiddo can’t do dairy. Do you think dairy free shredded cheese will work?
I haven’t tried so I can’t say!
I just made this recipe with dairy free cheddar and I thought it worked!
Should I bake or boil the potatoes?
I air fried which is closer to baking than boiling. But either should work!
Hi! I’m interested in trying out this recipe. I think I could run it through my pasta wheel to get the nice even roll on it! 🤔
I’ve never tried that but I bet it would work! You might have to reduce the cooking time depending on the thickness.