
This post may contain affiliate links. Please see our disclosure policy.

These healthy Twix bars are so easy to make and taste amazing with a caramel layer over a buttery shortbread base, all coated in chocolate. You’re gonna love the irresistible crunch and chew in every bite!

Why You’ll Love These Healthy Twix Bars
My favorite candy bars growing up were Twix, Reese’s, and Snickers – none of which I can eat anymore. But making homemade candy bars isn’t as hard as you’d think which is why I’ve made a recipe for these healthy twix bars, paleo reese’s bars and no bake vegan snickers bars! These vegan Twix bars are the ultimate treat – sweet, satisfying, and made with real ingredients you can feel good about. The combination of a shortbread cookie layer, chewy caramel (I use my homemade 5-minute salted caramel sauce recipe), and smooth chocolate is pretty much perfection.
If you’ve ever looked at the ingredient list on this classic candy bar, you know it’s packed with refined sugar, dairy, gluten, and preservatives – basically a hard no for me. These are made with healthy ingredients and, as mentioned above, they’re shockingly easy to make. Each layer comes together separately, and only the cookie base requires baking. If you’ve been missing Twix bars and want to make your sweet tooth happy, you have to try this healthy homemade Twix bars recipe.
Watch a Short Video of This Recipe
Ingredient Notes
Here are a few notes and substitutions on the key ingredients for these healthy Twix bars. Jump to the recipe card for the full recipe and exact measurements.
Shortbread Layer
- Coconut flour: Creates a soft, crumbly texture while keeping these bars grain-free and naturally gluten-free. No direct swaps work the same, but almond flour or oat flour might work with adjustments to the liquid.
- Maple syrup: Adds natural sweetness with a rich, caramel-like depth. Honey works too (just not vegan), but the flavor will be slightly different.
- Coconut oil: Binds the shortbread together while giving it that buttery texture without actual butter. Grass-fed ghee (not vegan) could be an alternative.
Caramel Filling
- 5-minute Salted Caramel Sauce (with reduced salt): This dreamy, gooey layer is what makes these taste like a real Twix bar! Keep the salt lower to balance the sweetness. Keeping the salt lower balances the sweetness. If you want a nutty twist, you can stir in a spoonful of almond butter or cashew butter for extra richness.
Chocolate Coating
- Dairy-free or paleo chocolate chips: These melt down into a smooth, rich coating that hardens beautifully. I love these for a vegan option, and these for paleo. Depending on your taste preference, you can go with milk chocolate chips for a sweeter touch or dark chocolate chips for a more intense flavor.
- Coconut oil: Helps the chocolate melt into a glossy, pourable consistency and keeps the coating from cracking when you bite in.
- Flaky sea salt: Don’t skip this! A sprinkle of flaky sea salt balances the sweetness and makes every bite even more delicious.

How to Make Healthy Twix Bars
Step 1: Preheat oven to 350 degrees F, and then line an 8×8 square pan or baking dish with parchment paper.
Step 2: Add all ingredients for the shortbread layer in a mixing bowl and mix until a dough forms. Press evenly into the pan.
Step 3: Bake for 10 minutes until the edges are golden brown. Cool for 10 minutes.
Step 4: While the shortbread layer is baking and cooling, make my 5-minute Salted Caramel Sauce. Remove from heat and set aside until the shortbread layer is ready.
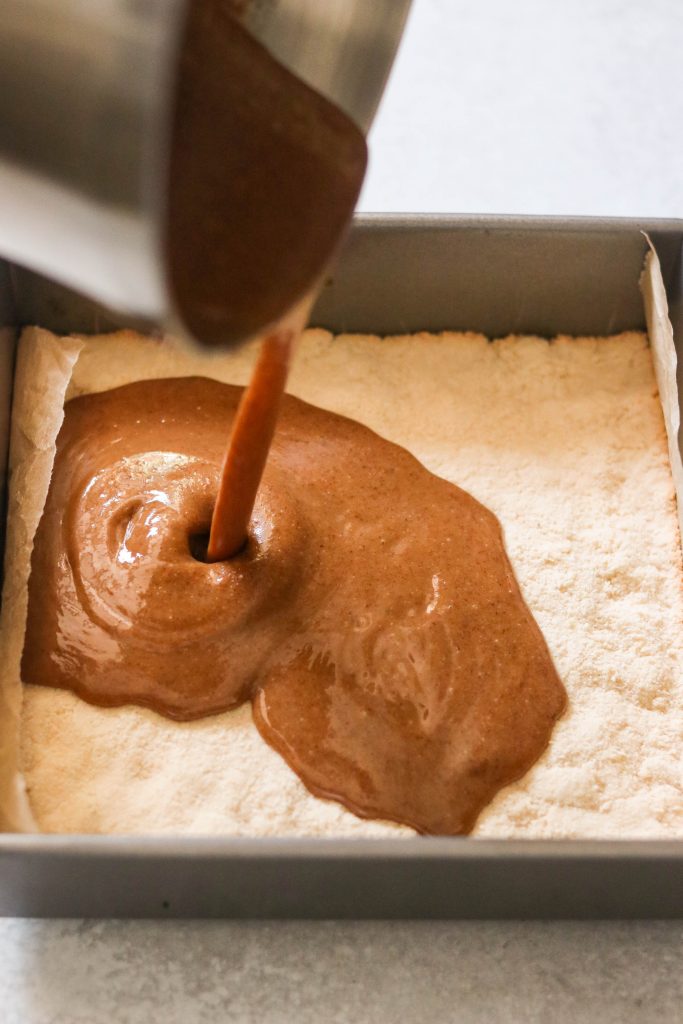
Step 5: Pour the caramel sauce over the shortbread layer, and spread evenly. Freeze for 1 hour until set.
Step 6: Melt together chocolate chips and coconut oil for the chocolate layer until smooth and creamy.

Step 7: Remove the pan from the freezer, then cut the set shortbread and caramel into 16 bars. Line a pan or a large plate with parchment paper.

Step 8: Dip each bar into the melted chocolate layer and coat on all sides. Transfer the dipped bars onto the parchment paper in a single layer without touching each other. Freeze for at least 5 minutes. Sprinkle with flaky sea salt, and enjoy!

Step 9: Freeze for at least 5 minutes. Sprinkle with flaky sea salt, and enjoy!
Expert Tips
- Don’t rush the freezing step! The caramel needs time to set so the layers hold together when dipping in chocolate.
- Use softened (not melted) coconut oil in the shortbread to get that perfect texture.
- For clean chocolate coating, use a fork to dip each bar and let the excess drip off before placing it on parchment paper.
Serving Tips
- These bars taste amazing straight from the fridge, but if you like a softer caramel, let them sit at room temperature for 5 minutes before eating.
- Serve them with a paleo & keto Dalgona matcha latte.
- Want to make these into a fun dessert platter? Serve them alongside my fudgy paleo chocolate brownies or paleo & vegan salted caramel thumbprint cookies.

Storage Tips
Store in an air-tight container in the refrigerator for up to 2 weeks.
Keep them in a freezer-safe container for up to 3 months. Let them thaw for a few minutes before enjoying.
Frequently Asked Questions
The original Twix bars are not gluten free or dairy free. However, this gluten free Twix recipe tastes so much like the real deal, so I hope you try it out!
Yes! As long as you use paleo-friendly chocolate chips, these bars are completely paleo.
More Homemade Treats
- Orange Cookies Recipe with Creamsicle Frosting
- Strawberry Cheesecake Cookies
- Easy Creamy Homemade Fudgesicles Recipe (Dairy-Free)
- Gluten Free Chocolate Zucchini Bread (Gluten Free, Paleo)
- Vegan No Bake Snickers Bars (Paleo Option)
- Paleo Reese’s Bars
If you make this recipe, please leave me a star rating and comment below! I love to hear your thoughts and feedback. Follow me on social media Instagram, Facebook, and Pinterest for even more delicious recipes!

Homemade Healthy Twix Bars Recipe (Paleo, Vegan)
Video
Ingredients
Shortbread Layer
- 1¼ cup coconut flour
- 1/4 cup maple syrup
- 1/3 cup coconut oil, softened (not melted)
Caramel Filling
- 1 batch 5-minute Salted Caramel Sauce, reduce salt to 1/4 tsp
Chocolate Coating
- 1½ cup dairy free chocolate chips, or paleo chocolate chips
- 2 tbsp coconut oil
- Flaky sea salt
Instructions
- Preheat oven to 350 degrees F, and line an 8×8 baking dish with parchment paper.
- In a mixing bowl, add all ingredients for the shortbread layer and stir until a dough forms. Press into the parchment lined pan evenly.
- Bake for 10 minutes until golden brown at the edges, then cool for 10 minutes.
- While the shortbread layer is baking and cooling, make my 5-minute Salted Caramel Sauce. Remove from heat and set aside until the shortbread layer is ready.
- Pour the caramel over the shortbread layer, and spread evenly. Freeze for 1 hour until set.
- Using a double boiler or the microwave, melt together chocolate chips and coconut oil for the chocolate layer until smooth and creamy.
- Remove the pan from the freezer, then use the parchment paper to take the set layers out of the pan. Cut into 16 bars. Line a pan or a large plate with parchment paper.
- Dip each bar into the chocolate layer, coating on all sides. Use a fork to transfer the dipped bars on to the parchment paper in a single layer without touching each other.
- Freeze for 5 minutes. Sprinkle with flaky sea salt, and enjoy! You can store in an airtight container in the freezer for up to 1 month, or in the refrigerator for up to 10 days.
Notes
- Don’t rush the freezing step! The caramel needs time to set so the layers hold together when dipping in chocolate.
- Use softened (not melted) coconut oil in the shortbread to get that perfect texture.
- For clean chocolate coating, use a fork to dip each bar and let the excess drip off before placing it on parchment paper.
- Store in an air-tight container in the refrigerator for up to 2 weeks.
- Keep them in a freezer-safe container for up to 3 months. Let them thaw for a few minutes before enjoying.
Nutrition
Nutrition information is automatically calculated, so should only be used as an approximation.
Regarding other affiliate links and affiliate relationships: In order for me to support my blogging activities, I may receive monetary compensation or other types of remuneration for my endorsement, recommendation, testimonial and/or link to any products or services from this blog. Thank you for your support and understanding.

Can butter be used instead of coconut oil?
yes!
Could almond flour be used instead of coconut?
I haven’t tried. You may need to reduce the maple syrup and coconut oil since coconut flour is much more absorbent.
Would it work woth peanut butter instead of almond butter?
Yes!
Hey this recipe looks so good but can I use all purpose flour instead of coconut?
I think so. I’m not sure about the quantity though, so I would just add a little bit at a time until a dough forms.