This post may contain affiliate links. Please see our disclosure policy.
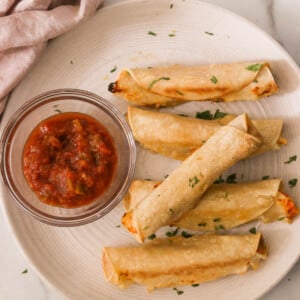
If you’re craving a crispy, cheesy Mexican-inspired appetizer, these baked chicken taquitos are the answer! Made with shredded chicken, cheese, salsa, and warm tortillas, they come together in just 30 minutes. Whether you bake or air-fry them, they’re perfect for meal prep and freezer-friendly!

Why You’ll Love These Homemade Taquitos
I’ve been preparing chicken taquitos for my kid’s after-school snack, and they’ve been such a hit! They’re perfect for making in advance, and you can easily freeze them for later too. If you’ve been around here for a while, you may have tried my Grain Free Paleo Taquitos too (another delicious option)!
Taquitos, also known as rolled tacos, are a staple in Mexican cuisine and are believed to have originated in Northern Mexico. According to Wikipedia, traditional taquitos are fried, but this recipe offers a healthier baked alternative.
These chicken taquitos are irresistibly crispy on the outside with a cheesy, flavorful filling. They’re super easy to make, and when I’m serving them to my family, I like to sneak in some veggies for added nutrients (totally optional). The best part is you can’t even taste the veggies!
I used Rotisserie chicken for this recipe, but you can use any leftover chicken you have on hand. For a delicious grilled chicken alternative, check out my Pollo Asado Recipe and shred it for these taquitos– yum!). If you love bold flavors, try my tender Instant Pot Barbacoa as a taquito filling! Looking for another protein option? My Instant Pot Shredded Beef works perfectly in these taquitos.
Watch a Short Video of This Recipe
Ingredient Notes
Shredded chicken is an ideal protein for taquitos, frequently featured in Mexican cuisine alongside rich and creamy cheddar cheese, tangy Greek yogurt, and zesty salsa, creating a flavorful and satisfying filling.

- Cooking spray: Use olive oil or avocado oil to achieve a crispy, golden texture without deep frying.
- Greek yogurt: A creamy, protein-rich alternative to sour cream, adding tangy richness.
- Salsa: Enhances flavor with a balance of acidity and spice; opt for chunky salsa or fire-roasted salsa for depth.
- Fresh lime juice: Brightens the flavors with citrusy freshness, complementing the spices.
- Chili powder: Brings warmth and mild heat, a staple in Mexican cuisine.
- Ground cumin: Provides an earthy, smoky depth, commonly found in traditional taquito recipes.
- Onion powder: Enhances the umami profile and boosts overall savory flavor.
- Garlic powder: Adds a rich, aromatic depth, a must-have in Mexican chicken dishes.
- Cooked shredded chicken: Rotisserie chicken works best for convenience and tenderness, but you can also use slow-cooked or leftover chicken.
- Shredded cheddar cheese: Melts beautifully to add creaminess; swap with Mexican blend cheese for an authentic touch.
- Medium carrot (optional): Adds a slight natural sweetness and extra nutrients.
- Red bell pepper (optional): Provides a pop of color, freshness, and a mild sweet crunch.
- Salt and black pepper: Essential seasonings to enhance all flavors.
- Corn tortillas: The traditional choice for authentic chicken taquitos, offering a crispier texture. Small flour tortillas can be used for a softer bite.
- For serving: Garnish with fresh cilantro, guacamole, pico de gallo, sour cream, and extra salsa for dipping.
By using these high-quality ingredients, your chicken taquitos will have the perfect balance of crispiness, flavor, and authenticity!
See the printable recipe card below for exact ingredient amounts.
Step-by-Step Instructions
Baking instead of frying makes these taquitos healthier while keeping them crispy. You can also make them in an air fryer for a golden finish.

Step 1: Preheat oven to 425 degrees F, and line a baking sheet with parchment paper. Lightly coat with cooking spray. In a large bowl, add Greek yogurt, salsa, lime juice, chili powder, cumin, onion powder, and garlic powder. Stir to combine.

Step 2: Add chicken and cheese to the mixture, and stir until well incorporated. Taste to add salt and pepper, if you prefer.

Step 3: Heat tortillas in the microwave for 20-30 seconds, or cook individually on a pan over medium-high heat for 20-30 seconds on each side. Keep them on a plate covered with a damp kitchen towel while you work so they stay soft and pliable.

Step 4: Place about 3 tbsp of the chicken mixture at the bottom of each warm tortilla and roll tightly. Place seam side down on the prepared baking sheet in a single layer without touching each other.

Step 5: Spray the top of the taquitos with cooking spray, then bake in the oven for 15-20 minutes until they’ve achieved golden brown, crispy perfection.

Step 6: Serve with your favorite toppings and dips like cilantro, guacamole, sour cream, and salsa.

Recipe Tips & Variations
- You can make the chicken filling a day ahead and keep in an airtight container in the refrigerator. Prepare and roll in the tortillas before baking.
- Instead of using the oven, you can make air fryer chicken taquitos by following the same instructions but cooking for about half of the time (8-10 minutes).
- Taquitos are great because they can be easily customized to your liking! Here are some fun variations:
- If you’re looking for a vegetarian option, add black beans to the filling instead of chicken.
- Omit the cheese and make them black bean and chicken.
- Add some canned green chiles to the filling for added spice and flavor.
- Make the filling with this Instant Pot Barbacoa or Shredded Beef instead of chicken!
- Pair these taquitos with guacamole, pico de gallo, and sour cream.
- Serve with a side of cilantro lime rice or Mexican rice and refried beans or black beans for a full meal.
Storage Tips
Leftover taquitos can be stored in the fridge for up to 5 days. Reheat in the oven at 350 degrees for 10-15 minutes until crispy again, or in the air fryer at 350 degrees for 5 minutes.
You can also freeze the taquitos after rolling and before baking. Just place the rolled taquitos on a baking sheet without touching each other and place them in the freezer until solid. Transfer to a resealable freezer-safe bag. You can cook right from frozen when ready to eat. Bake in the 425-degree oven for 20-25 minutes until golden and crisp.

Recipe FAQs
Taquitos are super versatile and can be served with a number of things! Try serving them with this street corn pasta salad, blueberry salsa, guacamole, Mexican rice, and more!
They are actually quite simple. In this case, we’re using leftover shredded chicken, a blend of Mexican spices, salsa, and creamy Greek yogurt, cheese, and warm tortillas!
Yes, chicken taquitos can be gluten-free, but it depends on the tortillas and ingredients used.
–Corn tortillas are naturally gluten-free, making them the best choice.
–Flour tortillas contain wheat and are not gluten-free.
Check labels on store-bought salsa, seasonings, and cheese, as some may contain hidden gluten.
Yes! Chicken taquitos are perfect for meal prep and can be made ahead, stored, and reheated for a quick meal.
–Before baking: Assemble and roll the taquitos, then store them uncooked in an airtight container in the fridge for up to 2 days.
–Freezing: Lay them in a single layer on a baking sheet, freeze until solid, then transfer to a freezer-safe bag for up to 3 months.
Reheating: From frozen: Bake at 425°F (218°C) for 20-25 minutes.
From refrigerated: Bake at 400°F (204°C) for 15-18 minutes or air-fry at 375°F for 8-10 minutes.
–Taquitos are typically made with corn tortillas, making them smaller and crispier.
–Flautas are often made with flour tortillas, which are longer and have a slightly softer texture.
More Mexican Food Inspired Recipes
If you make this recipe, please leave me a star rating and comment below! I love to hear your thoughts and feedback. Follow me on social media Instagram, Facebook, and Pinterest for even more delicious recipes!

Quick & Easy Homemade Chicken Taquitos Recipe
Video
Ingredients
- Cooking spray
- 3/4 cup Greek yogurt, or sour cream
- 1/4 cup salsa, of your choice
- 1 tbsp lime juice
- 1 tsp chili powder
- 1/2 tsp cumin
- 1/2 tsp onion powder
- 1/4 tsp garlic powder
- 2 cups cooked shredded chicken, I used rotisserie chicken
- 1 cup shredded cheddar, or Mexican blend cheese
- 1 medium carrot, OPTIONAL
- 1/2 red bell pepper, OPTIONAL
- Salt and pepper, to taste
- 18 corn tortillas, or flour tortillas (small)
- Cilantro, guacamole, sour cream, salsa, etc, for serving
Instructions
- Preheat oven to 425 degrees F, and line a baking sheet with parchment paper. Lightly coat with cooking spray.Cooking spray
- In a large bowl, add Greek yogurt, salsa, lime juice, chili powder, cumin, onion powder, and garlic powder. Stir to combine.3/4 cup Greek yogurt, 1/4 cup salsa, 1 tbsp lime juice, 1 tsp chili powder, 1/2 tsp cumin, 1/2 tsp onion powder, 1/4 tsp garlic powder
- Add chicken and cheese to the mixture. IF USING, mince the carrot and bell pepper with a sharp knife, or process in the food processor until fine. Add to the bowl, and stir until well incorporated. Taste to add salt and pepper, if you prefer.2 cups cooked shredded chicken, 1 cup shredded cheddar, 1 medium carrot, 1/2 red bell pepper, Salt and pepper
- Heat tortillas in the microwave for 20-30 seconds, or cook individually on a pan over medium high heat for 20-30 seconds on each side. Keep them on a plate covered with a damp kitchen towel while you work so they stay soft and pliable.18 corn tortillas
- Place about 3 tbsp of the filling at the bottom of each tortilla and roll tightly. Keep the seam down and place on the prepared baking sheet in a single layer without touching each other.
- Spray the top of the taquitos with cooking spray, then bake in the oven for 15-20 minutes until crispy.
- Serve with your favorite toppings and dips like cilantro, guacamole, sour cream, and salsa.Cilantro, guacamole, sour cream, salsa, etc
Notes
-
- You can make the chicken filling a day ahead and keep in an airtight container in the refrigerator. Prepare and roll in the tortillas before baking.
-
- Instead of using the oven, you can make air fryer chicken taquitos by following the same instructions but cooking for about half of the time (8-10 minutes)
-
- Taquitos are great because they can be easily customized to your liking! Here are some fun variations:
-
- If you’re looking for a vegetarian option, add black beans to the filling instead of chicken.
-
- Omit the cheese and make them black bean and chicken.
-
- Add some canned green chiles to the filling for added spice and flavor.
-
- Make the filling with this Instant Pot Barbacoa or Shredded Beef instead of chicken!
-
- Serve as a meal with a side of cilantro lime rice or Mexican rice and refried beans or a side salad.
-
- Serve with a variety of toppings and dips like my homemade guacamole, sour cream, chopped cilantro, and more!
-
- Taquitos are great because they can be easily customized to your liking! Here are some fun variations:
- Leftover taquitos can be stored in the fridge for up to 5 days. Reheat in the oven at 350 degrees for 10-15 minutes until crispy again, or in the air fryer at 350 degrees for 5 minutes.
- You can also freeze the taquitos after rolling and before baking. Just place the rolled taquitos on a baking sheet without touching each other and place them in the freezer until solid. Transfer to a resealable freezer-safe bag. You can cook right from frozen when ready to eat. Bake in the 425-degree oven for 20-25 minutes until golden and crisp.
Nutrition
Nutrition information is automatically calculated, so should only be used as an approximation.
What Great Grandma Ate / Jean Choi is a participant in the Amazon Services LLC Associates Program, an affiliate advertising program designed to provide a means for sites to earn advertising fees by advertising and linking to Amazon.com.
Regarding other affiliate links and affiliate relationships: In order for me to support my blogging activities, I may receive monetary compensation or other types of remuneration for my endorsement, recommendation, testimonial and/or link to any products or services from this blog. Thank you for your support and understanding.


Fast and delicious. Enjoyed by adults and kids alike.
Can these be made with flour tortillas? Would it change the baking time? Thanks so much, can’t wait to try, will report back with a rating after making!
Yes! You don’t need to change the baking time at all. 🙂
Yum! Saw this on a FB reel and decided to try. The whole family liked it! Thanks for the new recipe to add to the rotation.
Yay! Thank you so much!
I enjoyed the flavor of this recipe, but almost every one of the taquitos broke open on my baking sheet as they cooked which was disappointing for the aesthetics of it. They still tasted great though!
If you want a great crunch out of the taquito though, I suggested frying it with some oil on your stove top. Not as healthy, but they stayed together for me and tasted even better than the oven baked ones did.
I find that it helps to keep them wrapped up in a moist kitchen towel after heating them up, especially with corn tortillas! Also, make sure that tortillas are fresh. Older tortillas tend to break easily.